Wednesday, January 28, 2009

How to show Text inside Title bar (FOLDER NAME) in Windows 7 / Get back the Text (FOLDER NAME) in the title bar in windows 7 Explorer

The Text in the Title bar of Windows helps us to identify which one is it. It may help some times. But in Windows 7 by default the text won't show up. Only the blank title bar will show. So here is a small utility that will bring back the text in the title bar of Windows 7 operating system.

"Aero Bar" is a small utility that will bring back the text feature in Windows 7. Utilities such as NotePad, Calculator etc. will show the text but Windows Explorer won't. So this application will do it.

Get Title back in Windows 7 Explorer

All you have to do is download and run it. Thats all. Form now on you will get the text in Windows Explorer too.


Download Aero Bar now

Labels: , ,

Monday, January 26, 2009

Change the Working or Action of Power Button in Windows 7

Windows 7 had been greatly modified to make your work easier. In windows vista you need to undergo many steps in order to change the working or to customize the power button in it. In windows 7 this made very easy. No more irritating steps. Just fast and simple. Here's how to do it.

You can easily change the working of the Power button in the Start Menu.
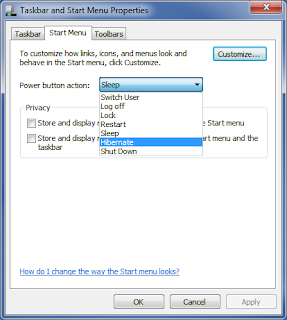
Windows 7 Power button Function Change


To do it just right click on the Start Menu and select the Properties option.

Now go to the tab showing Start Menu. Now select the drop down menu near to Power button action:. You will be presented with many functions that the power button can do. Select the one you want and select Apply and select OK.


Labels: ,

Sunday, January 25, 2009

Windows 7 Registry Tweaks>> Registry Tweaks for Speeding Up Windows 7 / A nice collection of most Useful Tweaks for Windows 7

Winodws 7 Registry Tweaks
Every windows user will be using a lot of tweaks these days for speeding up their system. I am sure all will be waiting for the Registry tweaks for the newly born Windows 7 operating system. Here are some registry tweaks that can be safely applied after its installation or later. I am sure these tweaks can speed up Windows 7.
First of all i will tell what all changes will be made after applying the tweaks.

  • Hanged programs will be terminated quickly.ie. Automatically it will end tasks of programs that are taking longer to respond.
  • Menus will be shown very faster. When you pause on the main menus the sub menus will be shown up very fast than normal.
  • You will get an option " Take Ownership" when you right click on files or folders. This will become handy when you want to replace system files while doing customization.
  • Make windows not to search for a program that no longer exist when you click on the shortcut there by saving your valuable time.
  • Adds "Copy To" and "Move To" options in the right click context menu of Windows 7. So from now on copying and moving files from one place to another will be more easier than before.
  • Directly opens up the Files list when you choose "Open With" option there by deactivating the " search on Internet " option.
  • Speeds up the navigation in Windows Explorer by disabling searching for network printers and scheduled tasks on network.
  • Disables the annoying "low disk space" message notification in your system tray.


Download Registry Tweaks For Windows 7


Restart your system after applying these registry tweaks to take effect. You will also get a small speed increase in Windows 7

Labels: , ,

Optimize Windows by Removing Junk that the Disk Clean Up Won't / Make a Disk Clean utility and up clean more Files

Everybody don't like junk. There are a lot of junk files created in Windows by default. The Disk Clean up Utility in Windows help us to remove the system Clutter upto certain extend. Disk Cleanup can also remove the outdated or older restore points being created by System Restore which we do not need any more. But there are many temporary files the Disk Clean up utility of Windows wont clean by default. We can configure it to clean up those unnecessary junk there by making more space available.

Here we are not going to do any thing with the Disk Clean up utility but we create a small batch file that does the clean up job as the Disk Clean up utility does.

  1. Open the Notepad and type the following in it.
  2. del /s /q "C:\Documents and Settings\placeyourusernamehere\Local Settings\Temp\*.*"
  3. You need to replace placeyourusernamehere with the User name you have logged into Windows.
  4. Now save the files as a bat file. To do this select "Save As" option from notepad and select "All Files" from "Save as type" tab. and give the file name as TempKill.bat.
  5. When you want to clean the temporary files you can run this file. If you want this to run this automatically with the Windows just place the file in the start up folder of windows for that go to this location.
  6. C:\Documents and Settings\placeyourusernamehere\Start Menu\Programs\Startup
  7. Now do step 3.

That's it! From now on the files in the temp folder will be cleaned automatically on Windows Start Up.

Labels: , , ,

Thursday, January 22, 2009

Install Windows 7 or Windows Vista from a Pendrive / USB drive (Working 100 %) for XP users

I had written the tutorials to make a Pendrive / USB drive bootable for installing Windows Vista and Windows 7 from it. But the steps given in those tutorials worked for users using Windows Vista and Windows 7 only. So some of my visitors asked me for a solution since they were using Windows XP. (Thanks Miguel for bringing this to my notice).So Here is it.


First you have to format your pendrive / USB drive to NTFS format.
For that download this tool and format your pendrive in NTFS format. Don't use quick format option. Now follow the steps from step 14 on this tutorial to Install Windows 7 from Pendrive (Work for Windows Vista Too).

Labels: , , , ,

Wednesday, January 21, 2009

Unpin or Remove Irremovable Entries in Windows 7 Start Menu

In Windows you can pin your favorite program to the start menu. However in Windows 7 some of the pinned application become non removable ie. they can not be removed or unpinned from the Windows 7 start Menu. For example MY Computer, Recycle bin etc will not show any option to remove them. Here is a simple way to remove the irremovable items.
You have to navigate to the regedit and just delete a registry entry that's all we want to fix this problem. For that, type regedit in the RUN from start menu and regedit will open up.

Now navigate to HKEY_CURRENT_USER\Software\Microsoft\Windows\CurrentVersion\Explorer\StartPage and you can see a Key named Favorites in the Right Pane. Just delete this entry. Done!

This will remove all the entries or pinned items from the start menu and you have just to re-pin you favorite items .

Labels: ,

Monday, January 19, 2009

Format Pendrive or USB drive in NTFS Format and Prevent any Virus from Entering your Pendrive

NTFS file format offers more security and speed compared with the other file system's like FAT or FAT32. When you want to format a Pen drive or USB drive in NTFS file system Format actually you will not see any option in Windows by default to do it. When you right click on the Pen drive's icon and choose format option you will get only two options FAT and FAT32 to format the pendrive. So you can format your USB drive in those two formats only. So here is a way to format you Pendrive in NTFS file system format.

The best advantage of NTFS file system format is that data can be written to the pendrive only using our system i.e. by your pc only (the data is secure). So when we plug on to other system they can only read the drive and cant write to it since the pendrive is in NTFS file format. So we don't need to fear any virus from entering our pendrive.
Here's how to do it.

  • Plug the USB drive or Pendrive to your PC.
  • Now right click on MY Computer in Desktop and select Device Manager.
  • Select Disk Drive and Expand it (+) and you can see your drive.
  • Now right click on it and select Properties and go to the Policies Tab.
  • Now activate the option showing Optimize For Performance and press OK .
  • This will enable the pendrive to be used in NTFS file format. From now on you will get the option to format your Pendrive or USB drive in NTFS file format.
You will also notice a speed increase in writing and reading data with your pendrive, this is because the pendrive or USB drive is now optimized for performance mode.

Labels: , ,

Saturday, January 17, 2009

How to Get back / Restore Lost or Disabled Right Click Context Menu's

Most Windows users today, experiment with the windows registry most often without creating backups. What will you do while you are playing with the windows registry you have accidentally disabled the right click context menu. You no more get it while you right click on Files.

This is a problem occasionally faced by Windows users. There is a simple solution for that. You can get back the right click context menu by using the Windows registry itself.

  • First go to start and select RUN or press [WIN] + [R].
  • Now type 'regedit'. This will open up the Windows Registry Editor.
  • Go to HKEY_CURRENT_USER\Software\Microsoft\Windows\CurrentVersion\Policies\Explorer and check for the 'NoViewContextMenu' DWORD value is seen on the right pane.
  • If you see it just delete it by right clicking it and selecting Delete.
  • Now you will get the right click context menu back.
  • Also you may check for this option under the main branch of HKEY_LOCAL_MACHINE.

Labels: , , ,

Enabling Thumbnail Preview for more file formats like TIF, PCX, PSD, PSP/ Extend the functionality of Thumbnail Preview Feature of Windows

The thumbnail Preview Feature in Windows XP is very useful for identifying the Image files Quickly especially when you have a lot of image files in a directory. But the Thumbnail Preview is very limited for files like TIF, PCX, PSD etc. it shows only the icons of the files. Here is a software that can increase the functionality of the Windows Thumbnail Feature.

' ThumbView Lite ' a free shell extension for windows can support 19 more graphics formats so you will be able to preview almost all the image file formats. This program will automatically integrate into Windows and there is no need for a separate program to be launched. This tool will also enable windows Explorer to display main properties of the respective file types. Scarily used file types like EPS and CDR will be displayed as icons.

Download ThumbView Lite

Labels: , , ,

Friday, January 16, 2009

Install Windows 7 Extremely Faster !!!

I have earlier wrote a post on How to install Windows 7 Using a Pendrive or USB drive. But here is a fast way (similar to the method i posted). You may have noticed Installation taking very long time and some times the installation stops by middle all this problems can occur if you use DVD. And whats more the more you Use that DVD drive the bad it will become and we know that. So why not avoid these things and go for a faster and error free installation of Windows. This post is for Experienced Windows Users. All you want is a Windows 7 ISO image and a Pendrive or USB drive with 4 G.B or Greater space. You can install Windows 7 very much faster than installing from a DVD.

Just format the Pendrive to Fat 32 format and copy all the contents of the ISO image using xcopy g:\ h:\ /g /h (here g: is the DVD drive and h: is the location of the Pendrive).

Now just boot from the thumb drive as usual (To boot from the pendrive set the first boot priority to the Pendrive from BIOS) and you will notice a faster and robust installation of Windows 7.

Labels: , , , ,

Thursday, January 15, 2009

Get Dream Scene Feature back in Windows 7/Enable Windows Dream Scene Feature in Vista Home Premium, Home Basic , Business, Enterprise

Hi friends almost every body know whats the Windows Dream Scene Feature is. It will enable us to set moving pictures or videos as our Desktop Background. But This is a feature confined only to the Windows Vista Ultimate Edition. But the current beta versions of Windows7 has excluded this cool feature. But here is a solution to get the Dream Scene Feature not only in the non ultimate Editions of Windows such as Windows Vista Home Premium, Home basic, Enterprise but also in Windows 7 too!.

First you need a good video card for this feature to run smoothly. To get the Dream scene feature back you just need to follow a small step.

First download a small .exe file (link below). Now all you have to do is to run the file as Administrator.

Now i will tell how the file works . The program first copies the DreamScene.dll file to your %WinDir%\System 32 folder. Then it will copy DreamScene.dll.mui to the folder %WinDir%\System32\en-US and will add the needed registry values and will restart Windows for the changes to take effect.
You will also notice a folder created in %WinDir%\Web\ directory. Only in Windows Vista versions placing any video file in the folder will allow you to set that particular video as you desktop background.
In Windows 7 you cant see the video in the Desktop Background Personalization Page since it has bee cut off from Windows 7.But you can set it as the Desktop Background. To set a video file as Background right click on .WMV or .MPG file and select "Set as Desktop Background" from the right click context Menu.

Download Windows7-DreamScene.exe

Labels: , , ,

Wednesday, January 14, 2009

Power up/Speed up the Foreground process and get more control over Windows

How about Getting more Features when you right click on a window or on when it is on the taskbar. Many features such as Hide Others, Hide All, UnHide All, Unhide, Minimize to system tray, Transparency are there. You can use this wonderful utility and get full control over the windows. I say this is a must have utility for all the Windows Users.


You can make a process run faster by giving it a high priority and there by making your work faster than before. You can hide an opened window so that even by pressing Alt + Tab wont find it. Best of all this program is Free. Instead of wasting your taskbar area you can Minimize the windows to the system tray as small icons and more.This wonderful utility was created by one of my friend and software engineer Arif Ali.

Download Process Manager

Labels: , , , ,

Tuesday, January 13, 2009

Restart Crashed Programs Automatically and make your work Faster

Most frequently used programs such as e-mail clients, file sharing tools etc should run continuously. Some times these programs get crashed or get closed by mistake. So again we need to start them from the beginning. Instead of this if the programs start automatically by itself our work will get done more faster. You can automate this task of continuously checking whether the programs are active or not.

A tool called Monitor will do this task for you. So you don't have to bother again about those programs again. The program will automatically check whether the software's are active or not and will restart them accordingly.

Download the program from the link given below. When the program starts, click the "Add" tab and give a name in the "Name" and click the tab next OT "Path" to select the program file which needs to be monitored from the file dialog. You can even specify the parameters in the "Arguments" Section. Do not change the checking interval and create an entry for monitoring by clicking on "Create". Now all you need is to activate the check box seen in front of the respective task to start the automatic process.

Download Jockersoft Application Monitor

Labels: , , , , ,

Monday, January 12, 2009

How to Apply One Folder's View To all the Folders

In Windows Xp we get six different Folder views Thumbnails, Tiles, Icons, List, Details, Filmstrip. Each time when we open different type of Folder for example we opened a folder containing pictures we see the view set to Filmstrip or so. If you want to set it in tile view you have to select form the view option. Doing this for each and every folder is really time consuming.

Setting a particular Folders view setting to all the Folders will be the easy way.To do this just go to My Documents Folder and select the type of view you want too have in all the Folders from the view options after doing that. From the menubar select tools> Folder Options and select the 'View' tab from it. Now click on " Apply to All Folders " Options and select apply and then OK.

Thats it from now on you can get a common view setting in all the Folders.

Labels: , , , ,

Sunday, January 11, 2009

Install Windows 7 from a Pendrive (Working 100 %)/ How to create a bootable Pendrive to install Windows 7

Here is a small and working tutorial to install windows 7 from a bootable USB or Pendrive. These days most of them have a USB or Pendrive. So why don't you try this trick. Earlier i have posted on How to Install vista from a Pendrive. Installing Windows 7 using a pendrive is very much faster than that from DVD/CD. You just need to follow some small steps to do this. You can keep this pendrive/USB drive for future installation of Windows 7. If you are a beginner or dont want to get messed up by typing in all commands, here is a Free Utility To Create A Bootable USB To Install Windows 7, Vista & Server 2008. This tool will help you to automate the process of bootable pendrive's and you can install windows 7 from pendrive easily. If not you can follow this guide to install windows 7 from a pendrive.

Make sure you have a Pendrive or USB drive with a minimum of 4 GB space and you have the Windows 7 installation DVD. This tutorial is best suited if you have a Windows 7 DVD with you else you need to change it


  1. Format the Pendrive or USB drive in NTFS format first.
  2. From the start menu right click on the command prompt and select "Run as administrator".
  3. Now type the following commands (Press enter key after each command).
  4. diskpart. This is to open the disk partition program.
  5. Now to show the list of drives type list disk.
  6. You can see disk's listed there. Note down the disk number of your pendrive eg. Disk .
  7. Now type SELECT DISK X (where X is the number you noted down for the pendrive from step 5)
  8. Now type CLEAN.
  9. Now type the following commands by pressing enter after each one.
  10. CREATE PARTITION PRIMARY
  11. SELECT PARTITION 1 (Assuming your pendrive/ USB drive is 1).
  12. ACTIVE
  13. FORMAT FS=NTFS
  14. ASSIGN
  15. EXIT(Now the disk partition program will exit). Now we need to give some more commands.
  16. Now insert the Windows 7 Installation DVD and to your DVD drive.
  17. Here i am assuming DVD drive as G and Pendrive as I.(Change it accordingly).
  18. Now type G:CD BOOT
  19. Now type this command BOOTSECT.EXE/NT60 I: to update your USB drive with bootmgr code.
  20. Finally copy all the contents from the Windows 7 DVD to your Pendrive. Make sure you don't cause any errors.
  21. Plug / Insert your pendrive to your PC and restart the system.
  22. Now Enter the Bios system accordingly by pressing the key delete.(This may vary some times it will be F2 or F12. It depends on the type of your system. Any how during the start up your system will display which key to press to enter the Bios).
  23. Now select the USB/ Pendrive as the first boot driver.(Set the first boot priority to USB drive.).
  24. Now save the settings in Bios and restart and you will be able to Install Windows 7 using that pendrive.
If you liked it make a comment . Feel Free to ask if you have any doubts. I will Try my best to Help You.

Labels: , , ,

Get Back the 'Send to PowerPoint' Option/ Unlock the hidden Send to PowerPoint option in Word 2007

In the versions earlier than 2007 a well structured document can be send to PowerPoint and it got converted to slides automatically. Word 2007 don't come with this option. This was an option very useful for the Office users but Microsoft has hidden this option!.Here is how to get it back.
The function is actually in there but hidden.
  1. To get tit back click on the Office Button on the top left corner in Word and select 'Word Options' from it.
  2. Now in the dialog box select 'Customize'.
  3. Now from the ' Choose commands from : ' drop down menu select the option 'All Commands'.See that 'For all documents' option is selected else you can get that option only for the current document you are working with now.
  4. Now, look for the command 'Send to Microsoft PowerPoint' and click 'Add' and click 'OK'.
From now on you can send a document to powerpoint from the quick access bar.

Labels: ,

Saturday, January 10, 2009

Recovering Deleted Bookmarks in Firefox/ Reconstructing Deleted Bookmarks

The " Most frequently visited " Folder in the Bookmarks toolbar will help you to search through your favorite site's faster. What will you do if you have accidentally deleted them or overwrote them during backup of your computer and you are in need of them to find one of your favorite site.

This is really a problem in Firefox. No option is provided with it to get back the deleted bookmarks once it is gone!. This is so because the bookmark library is a very small database and you need to define a query for that.Here is a solution to recover them.

  1. Right click on the bookmark symbol bar and select " New bookmark ".
  2. Give " Most frequently visited websites " as the" Name ".
  3. Now type this query in the address field " place:queryType=1&sort 8&maxResults=20 ". Type this carefully.
  4. Confirm by clicking " Add ".
  5. Done!
Now i will saw how this works. You ask to pull the results from the browser history with " queryType=0 " and sort them in decreasing order of visiting frequency with " sort=8 " and maxResults=20 will decide how much entries should be displayed. It can be given as you wish it can be 20 or 30 or 40.

Labels: , ,

Friday, January 9, 2009

How to DELETE a File that is currently being used/ Deleting files Blocked by a Program

Some times Windows refuses to delete some files when we try to delete a file that is supposedly in use. But you know very well that you have not opened that file or the files is not currently being used by any software. This is really a irritating situation. Here is a solution to delete those blocked files.

A small software called ' Process Explorer ' can relieve you from this situation.It will help you to end the corresponding program that is using a particular file without much worry!.

Using the program is easy. Open the ' Find | Find Handle or DLL' to find the application you want to close. You may enter the file name displayed in the windows error message and do a search. The program which is using that file will appear in the process column. Now things are more easy just right click the corresponding program and select 'Kill process'. This will terminate the program that is currently using the file and now you will be able to delete the file without any problem.

Process Explorer has many more features it can be used as a replacement to the default Windows Task Manager and its free too.!


Download Process Explorer

Labels: , , , , ,

Sunday, January 4, 2009

Get the AERO Peek Effect of Windows 7 in Vista and XP


Aero Peek is a cool and unique feature on Windows 7. Let me tell about it shortly. This is found as a small rectangle present last on the Windows 7 taskbar.

When you hover your mouse cursor over it you can see through all the maximized widows ie. all the maximized windows becomes transparent and only their outline will be showed.


A small application created by GeeQ can bring this effect in Windows XP and Windows Vista too. So from now on all the XP and Vista users also can enjoy this unique Windows 7 feature.

Download Aero Peek Utility now

To use it click on the icon in the system tray and Desktop preview will be activated to disable double click it.

Labels: , , , ,

Saturday, January 3, 2009

Install Windows 7/ Vista on your Hard disc Without using any DVD/CD or Pendrive (USB drive)

How about installing Windows 7 or Windows Vista without using any DVD or Pendrive / USB drive? Yes this is possible. Users who don't want to burn the Windows 7/ Vista ISO image to a DVD or those who don't have a windows startup disc can now install Windows 7 on their PC. Installing Windows from the Hard Drive is much faster than installing from DVD/CD.This tutorial is made on the assumption that the new Windows 7 or Windows Vista is going to be installed and replace the current one. The instructions can be slightly modified if you want a dual boot system.
  1. On your existing Operating System install a virtual DVD/CD drive first. Magic Disc virtual DVD/CD rom can do this and is free.
  2. Now mount the ISO image of Windows 7 or Windows Vista.
  3. Then copy all the files from this Virtual drive you mounted now to a drive in which you don't want to install Windows. for example if you want to install Windows on C drive copy them to E:\Windows7 or so.
  4. Now copy the bootfolders and bootmgr seen inside the copied folder (here E:\windows7) to your main booting drive probably C:\.
  5. Vista users must follow this step ie. you need to copy the bootmgr folder from (E:\windows7) to C:\ root directory. Copy E:\Windows7\boot\boot.sdi and bootsect.exe from E:\Windows7\boot\ folder to C:\boot folder and C:\ drive respectively.
  6. The boot folder is hidden by default check the option to show hidden files and folder and also show protected system files from "Folder Options".
  7. Now under C:\ root folder create a new folder named sources.
  8. Copy the boot.wim file from E:\Windows7\sources to the sources folder created in the above step (7).
  9. Now right click the Command Prompt in the start menu and select "Run as Administrator".
  10. Type the following command C:\boot\bootsect.exe /nt60 C: for vista users who did the step 5 should type the command as C:\bootsect.exe /nt60 C: .
  11. Now change the name of the boot system partion to any name you prefer (in command prompt use label command). for eg. type C:\ label mycdrive. Remember the name you have given.
  12. Now restart the System.
  13. After that Windows will automatically run the setup process. On continuing with the installation steps when you see the option to Install Windows do not click it instead click the option to Repair my Computer (seen at the bottom left).
  14. Now in the WinRE System Recovery Options window open the Command Prompt.
  15. Now type the following command format c: /q .
  16. /q switch is used to do a quick format option it is optional.
  17. If you want to convert the drive to NTFS system type the command as c: /q /fs:ntfs.
  18. Just before the formatting begins you may be asked to enter the name of the partition as mycdrive enter it accordingly.
  19. After the formatting completes Start the Windows setup from the copied folder ie E:\Windows7\sources\setup.exe.
  20. Now continue with the process as usual.

Labels: , ,

Thursday, January 1, 2009

Deleting Individual or Specific Search Terms/Items from the Auto Complete list

Automatic completion of text fields is a great help while doing online searches , filling online forms etc. This really help in saving a lot of time making our work faster. But unfortunately it also saves the terms entered incorrectly and every time it appears again and we again selects it by mistake. This creates a hindrance to our work.


So we need to clear out the incorrect or wrongly typed terms.In the browser, you can delete the form data through Delete in the Browser history section of the Internet options, found under "Tools>Internet options" > click " Delete Forms". the problem is that when you does so the entire list will get deleted.

To delete an individual item do as follows.

  1. Open a website which has input fields.
  2. Now position the cursor in the text field and start typing a term and the browser suggests some entries.
  3. Now select the term you want to delete by using the arrow keys and press [Del] button.
  4. That's it.

Labels: , , ,