Friday, July 31, 2009

Enlarge Images Without Losing Quality/Pixelated – 4 Must See Tools

When we Enlarge images chances are very less that we might get a perfectly enlarged image without any loss of quality. Either the image will be blurred, pixelated or noisy. This is a common problem faced by most of the people while enlarging images. Recently,  I came  across a few softwares and online services that will help to Enlarge pictures without losing any quality/getting pixelated/blurred.


Enlarge Images without losing quality or getting pixelated and blurred

1) SmillaEnlarger


This small Image Enlarger will help you to enlarge images photos without losing quality or getting pixelated. SmillaEnlarger can also convert a low resolution images to a high resolution images by minimizing the images distortion and by maintaining as much as details as possible. SmillaEnlarger comes with many image adjustment options and a instant preview window to see the real-time preview of the enlarged images. This utility certainly gives dramatically good results.
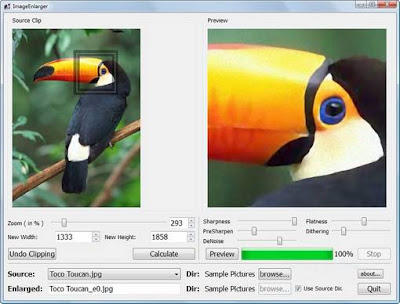
SmillaEnlarger - Enlarge Images Without Loosing Quality
But there is some  thing that i found annoying with this tool. The Lack of a Save Option!. We need to first select the directory containing the images. The program will save the images automatically with a new name. In short this Image Enlarger is a nice application that will help us to easily enlarge the images without making it lose its quality or getting blurred / pixelated.

Download SmillaEnlarger


2) VectorMagic


You may know that vector images are made of lines and curves which also have their respective position and colors used, stored in the images. So what make vector images special is that they can be resized into any size. You can decrease the image size or enlarge it to any size without losing any of its qualities. So, if we can convert the BMP and JPEG (bitmap) images into vector images. Enlarging images without losing quality will not be a problem at all. Thanks to Ray from Raymond since i came to know about vector magic from there.

Vector Magic is actually a website that will help you to enlarge images online. Vector Magic website provides a free online service to convert bitmap images to vector images easily. It makes this possible using its auto-tracer service.
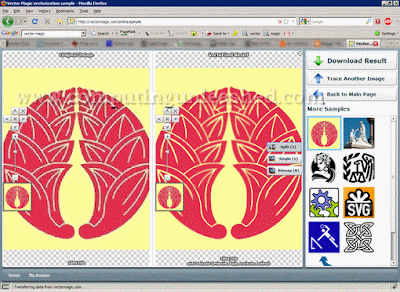
VectorMagic - Enlarge Images Without Loosing Quality

How to Use Vector Magic to Enlarge images


(You need to have adobe flash player installed in your system for this to work)


  1. Browse the Bitmap image to be converted into vector format and click on Upload.

  2. Now Select the quality level of the image and select if the image less than 12 colors or more than that.

  3. Choose the palette needed to convert your image into vector format.

  4. This is it. The final vector image can be downloaded in PNG, SVG or EPS formats.

You can now enlarge the image to any amount of size as needed without losing any quality or getting pixelated/blurred. Vector Magic produces excellent results and moreover it is free and its the best way to enlarge images free.

Visit Vector Magic to Enlarge Images


3) SizeFixer - Enlarge images up to 400%


SizeFixer is a wonderful tool from FixerLabs. Before starting with let me say SizeFixer is not a Free Tool so i didn’t wanted to include this in here, but later i thought of its usefulness to professionals so i included SizeFixer. What makes this tool special is its capability to enlarge images upto 400% of its original size. Thats way ahead of other softwares can do. SizeFixer makes this possible by automatically erasing the dark and faded parts in the image thus giving rise to a high clarity image without losing quality. SizeFixer was first released in 2005 for MAC. Later the windows version came up promising to enlarge images by 33×46 inches without losing any of its quality.
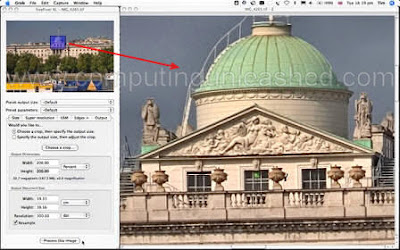
SizeFixer - Enlarge Images Without Loosing Quality
The "super-resolution technology" of SizeFixer contributes to the making of such gigantic images. SizeFixer comes in 3 different versions - XL, SLR & Home. SizeFixer Home version can Enlarge images upto a size of 16 Mega Pixels. SizeFixer is a pricier tool but it is worth for professionals. SizeFixer XL, SLR & Home costs $199.95, $269.90 & $59.95 respectively. SizeFixer is not just an ordinary tool because it is used by the government authorities, military and also in NASA. If you want to experience what SizeFixer is actually capable of then i suggest you to go for a free trial first.

Download Size Fixer


4) Reshade - Photo Enlargement Without Quality Loss


Reshade eliminates most of the problems faced during photo enlargement process such as pixelation, loss of focus, loss of sharpness, exagerated noise . Reshade also comes with an online service to resize the images. You can make the image smaller or enlarge it. The Desktop Version of Reshade is not free and it costs 149$ to buy and there is a premium online service too which offers similar features of the desktop application.


I am dealing with the free online service of reshade since it is free and does a decent job. It is adequate for home use. Professionals may require the paid version. You can use the Reshade service with or without an account but the features will vary. It is free to create  free account with reshade and it provides some more features. Signing up for a free Reshade account offers you the ability to enlarge images to a maximum resolution of 1920x1200px with a zoom of 2X.
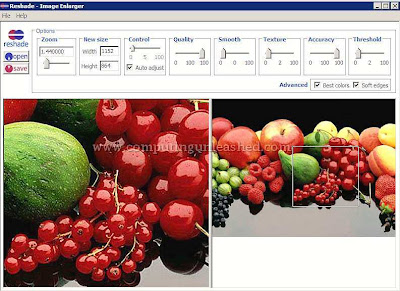
Reshade - Enlarge Images Without Loosing Quality
You will be able to enlarge images to standard monitor resolutions, enhance poor quality images, crop. It supports JPG, BMP, GIF, PNG image formats,  single frames and non-transparent, maximum file size is 10MB, maximum size is 4000x4000 pixels, minimum size is 50x50 pixels. You can either upload the image from your system or from direct link and then you can select the specifications and the enlarged image without much loss of quality will be ready for download with in a few seconds!

Visit Reshade Free Image Enlarger


if there are other image enlarging software's, comment it down Friends.

Labels: , ,

Wednesday, July 29, 2009

CONTROL Your MOBILE PHONES Just By SHAKING

Have you ever thought of controlling your Mobile actions just by simply shaking it in a particular way ? wont it be nice and fun to control your mobile phone’s actions just be shaking it ? If you are interested in it then G-Trigger is just for you. The HTC Diamond Mobile Phone used to have this technology first. G-Trigger was build to detect the shake in Windows Mobile Phones.

CONTROL MOBILE PHONES  SHAKINGG-Trigger will enhance the G-Sensor ability of your Mobile Phone. You can start a new application just by shaking your Mobile Phone in a Particular direction. You can assign the shake direction from left to right, front to back, Top to bottom and Vice-Versa. You only need to remember which particular shake will start which application, then using G-Trigger will be fun and a time saver.

Screen Shots of G-Trigger


Control Mobiles by Shaking - Actions of G-TriggerControl Mobiles by Shaking - Launch Programs with G-TriggerControl Mobiles by Shaking - Incoming Calls with G-TriggerControl Mobiles by Shaking - OSD Left to Right witn G-Trigger<br />
Media Players Supported in G-Trigger
Windows Media Player, S2P, Microfi Nitrogen, Core Player, TCPMP, Pocket Player
Pocket Music, Manila (TF3D) Music Tab.

Actions supported in G-Trigger


You can dial a number, launch Programs, answer/Reject incoming call, Activate a profile, volume control, Media Controls, WiFi/Bluetooth/Phone radio On/Off/Toggle, turn screen On/Off, send Keys, Save Screenshots (in BMP/JPG/PNG/GIF formats), Change Wallpaper (Today Screen, Manila Home & S2U2), close/minimize active window, Show/Hide/Toggle On-Screen Keyboard, Power Off/Power On/Long Press Power Button etc.


How to Use G-Trigger First


  • Transfer .cab file to any location in device.

  • Run the .cab file and install application to device storage.

  • Run the “G-Trigger” shortcut from programs.

  • Click “New” button on “Action” tab.

  • Enable the check boxes for the actions you want to activate.

  • Assign any action by clicking “…” button on the right side of action text box.

  • Click “Save” button on edit profile page, again click “Save” button on main page.

  • Click “Start” button to start the service.


G-Trigger is compatible with Mobile Phone running Windows Mobile OS 5, 6 and above. Also it works with HTC Touch Diamond, HTC Touch Pro, HTC Touch HD and Samsung Omnia (i900/i910). It needs .NET Compact Framework 3.5 to work properly.
This wonderful shake detector Application for Mobile Phones is a freeware. Shake and Enjoy.


Download G-Trigger

Labels: ,

Tuesday, July 28, 2009

How To Avoid Getting Banned on Twitter - 10 Useful Tips

Twitter has gained a magical ability to bestow credibility and relevance upon any one who uses it. Due to the growing trend twitter has almost a million users. So they too finds it to manage the same. Hence, we need to use twitter with some caveat. Recently one of my friend got banned on twitter. Till then i didn’t knew that twitter too bans its users whom it finds as a spammer. Once twitter find you as a spammer the very next you are banned. Since majority of the people uses twitter well,  they find it difficult to admit when they come to know that they are banned from the twitter world. This is just an embarrassing situation. Here are 10 Tips that will help you to avoid getting banned from twitter.

Avoid Getting Banned on Twitter
  1. Avoid Mass Follow : The first thing that might run into our mind when we join twitter is about the number of followers. Some of twitter users express a desire to get a mass number of followers in a short time. For that they try to follow as many people as possible in the hope of getting a follow back. When this follow process in twitter gets into an unusual way (following some 600 people a day – don’t get surprised this actually was a case with one of my best friends) twitter consider you as a spam and bans you from it. So don’t do  a mass follow and risk your twitter account. Follow people only if you find them worth.

  2. Forget the Twitter Auto Follow Sites : Some websites promise you a huge number of followers in your twitter account in a short period. When you reach 2000 followers in twitter your account will be noticed for any spam behaviour.These sites are of no use and put your twitter account into risk by putting spam updates into your account and like wise. Never join any of these sites.

  3. Avoid Duplicate Tweets with Multiple Twitter Accounts : For some or other reason people create multiple accounts on twitter . But keep in mind that posting same updates in multiple twitter accounts of yours will make twitter ban you easily. What ever be the reason you must never post the same updates in your account to another account of yours. When the updates consist mainly of links and not personal updates, there is a chance to get marked as spam and get banned from twitter.

  4. Following Act : This point is mentioned in twitter policy. Following and unfollowing the same people repeatedly, as well as following and unfollowing those who don’t follow back, are both violations of our terms of service. So never do this.

  5. Utilize DM the right way : Many twitter users these days send DMs (Direct Messages) to other twitter accounts. Sending personal Direct Messages are good but things go worse when you use DM the wrong way i.e. for promotional offers, advertising purpose etc. When people finds them annoying and they reports this to twitter which might soon get your twitter account to be added in the banned list.

  6. Avoid Duplicate Tweets on Same Account: Think before Retweeting any tweets since you might have tweeted that already before. Like in step 3 Posting the same update again and again in your same twitter account will make twitter find you as a spammer and Ban you.

  7.  Avoid the Hash Tags : Limit using too many # hash tags in your updates. You many use it since it helps but limit the number. Use it wisely.

  8. Block the Spammers : As i said before having connection with any spammers will risk your twitter account to get banned. So when ever you find any body suspicious or as a spammer block them or unfollow them.

  9. Don’t use Auto DM Tools : Some people use these Auto DM tools for marketing purpose like promoting their product through DM etc. Never Use the Auto DM tools. When people get irritated by these Auto DM’s (Direct Messages) they report them as spam which might risk your twitter account to ban.

  10. Avoid Autofollow Tools: Twitter will ban you if it finds your twitter account have any relation with spammers. There are many tools for twitter that will help you to autofollow people. Never use them because you might be following spammers. So when ever you follow people spend some time to check whether they are good ones or not. Else that might end up in getting your Account Banned From twitter.


Now its your turn if you have any good suggestions or tips don’t wait comment them below.

Labels:

Sunday, July 26, 2009

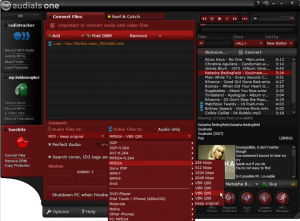
WIN (3) license/serial Giveaway for Radiotracker Platinum worth $120

My friend Avinash at avinashtech.com have organized a give away for Radiotracker Platinum. He is giving away 3 full version licenses of Radiotracker Platinum for free.

Features of Radiotracker Platinum

  1. Find, listen to, record, manage web radio, get MP3
  2. MusicFinder: fulfills your musical wishes by scanning thousands of web radio stations
  3. Find, subscribe and download podcasts
  4. Download and use wish lists from the community
  5. Output as MP3, OGG, WAV, AAC files
  6. Populate missing ID3 tags, cover artwork and lyrics, generate ringtones, burn CDs, synchronize with MP3 player
  7. Record social web radio sites as you listen to them in your browser
WIN (3) license Giveaway for Radiotracker Platinum worth $120Visit AvinashTech.com for participating and more details regarding the contest.

Labels: ,

Saturday, July 25, 2009

How to Clean dirty, smudged or Scratched CD/DVD Properly

The DVD or CD put outside the pouch/cover are likely to get dirty, smudged or scratched. Since the disk surface is very sensitive it is also prone to fingerprints. Data Recovery Rate will be very less from a dirty, smudged or Scratched CD/DVD. Even with the help of the best data recovery software's we might not get the required results. But if we clean the CD/DVD properly we may be able to recover the data in the disk to a good extent. So before we use some data Recovery Software’s we must clean the DVD/CD properly first. So here is how to clean a dirty, smudged or scratched DVD/CD. How to Clean dirty, smudged or Scratched CD or DVD ProperlyMost of us clean the Old DVDs or CD just by rubbing it with a soft cloth. This may work some time when the dust can be easily wiped off. But things go bad if the dirt or dust is stubborn. When we wipe the DVD/CD with stubborn dust using a soft cloth it actually damages the DVD or CD more and more. So don’t do it with aged DVDs or CDs.


How to clean a clean a dirty, smudged or scratched DVD/CD Properly


The CD/DVD cleaning process must be carried out carefully.


  • First you need to find a container good enough to submerge a DVD/CD completely in it.


  • Now take some liquid soap or glass cleaning solution in the container. Make sure that the soap solution you use is not a very strong one i.e. You must not use solutions that are used to clean metal surfaces etc. Hand washing liquids will do.


  • Take a little of the liquid soap or cleaning solution in the container (15 – 20 ml) .


  • Now pour clean hot water to get a little concentrated soapy solution. The water must be hot in a way that you can drink it. (I said like this because drinking water is the best for this purpose as it will be very clean).


  • Dip the DVD/CD into the solution and leave it aside for 5 minutes. Take out the DVD/CD and rinse it with clean water 3-4 times then after.


  • After rinsing the DVD/CD with clean water properly, Shake Off the excess water and Let the DVD or CD to dry naturally. You may put it under a fan but don’t try to dry it using any other ways.


You can use the DVD/CD on your system. Now you will have a very good chance of Data Recovery Rate from the disk.


Note:- If you have very important data in the DVD or CD you may seek professional help. I have no responsibility for any data loss caused.


Also Check :

5 Best Tools To Recover Data From Damaged DVD/CD and other Medias


Labels: ,

Thursday, July 23, 2009

Add a Floating Follow Me/US on Twitter Button To Your Website Easily

Most of the twitter users show their power by the number of followers they have. So its essential to get a good number of twitter followers if you want to become a power twitter user. Many websites out there put a small twitter icon, or a follow me on twitter statement near to their subscription button in their website to get followers. But actually these things go unnoticed for most of the visitors. So creating a floating Follow me/us on Twitter button in your website will surely grab viewers attention. (Each and Every visitor to your site will notice it for sure).

Add Twitter Follow ME button in WebsiteWhen i was looking for this i came across a website called Go2Web20  which gives the same. But it had many negatives. The most weird thing i found that it is based on JavaScript, so if a visitor with JavaScript disabled on his/her browser  visits the site then its of no use. Secondly it does not work on Internet Explorer (Still most of the people use IE). So i needed an alternative for this.


I found it easier to implement the same Twitter Follow floating button with the help of CSS. So, Here is a Simple way to


Add a Floating Twitter Follow Me/US Button to your website


The advantages of this method are :


It is compatible with all browsers.


It doesn’t use JavaScript at all. 


Add this CSS code to your Website First.


#twitter-follow { border: 0;position: fixed;  top: 200px; right:0;}

(Blogger users should add this before ]]></b:skin> in your template)

In the above code top: 200px; the distance from the top you can adjust it to suit your website.

Now add the following code to your Website. (For blogger users add the code in your template just after the <body> tag)


<div id="twitter-follow"> <a href="http://twitter.com/amalroy"><img src="http://img2.pict.com/91/e8/71/1279044/0/twitterfollowme.png" alt="Follow Me on Twitter" /></a> </div>

Replace my name with yours. Also if you need the image to be shown on left side just replace right:0; in the css code with  left:0;


Add a Floating Twitter Follow Me or US Button to your website

You can replace “http://img2.pict.com/91/e8/71/1279044/0/twitterfollowme.png” with your own twitter Follow Me/US image if you want.


And here is the link for Twitter Follow US button.Add a Floating Twitter Follow Me or US Button to your website
http://img2.pict.com/ad/29/8b/1279120/0/twitterfollowme.png

You will now have a Twitter Follow Me button in your website similar to mine.

If you have any doubts regarding this comment it down.

Labels: , ,

Tuesday, July 21, 2009

Win 2 Free Licenses of BatteryBar Pro – First Ever Give Away From CU [Updated]

I am Happy to organize the first ever giveaway at Computing Unleashed. I had earlier posted about one of the best and accurate battery meter for your Laptops. BatteryBar is a must have utility for Laptop owners who works a lot with their laptops daily. The Free ware version of BatteryBar provides a bunch of good options. Once you use BatteryBar it is certain that you will love it. Because BatteryBar helps us a lot in finishing our work in time with out causing any loss during a power failure.But as i have mentioned you don't get access to the Preferences option in the Free 30 day trial version of BatteryBar .


BatteryBar Pro version has still more to offer.

Features of BatteryBar Pro Version


    Win 2 Free License of BatteryBar Pro
  • Customizable themes to change the look and feel of BatteryBar

  • Low battery and critical battery notifications and audio alerts

  • Customize 20 settings, including changing the font, low battery warning levels, and more.

  • Change the current Windows power scheme by right-clicking on BatteryBar

  • New features in future versions that will only be available in the Pro version


In this give away i will be giving 2 Free Full Version Licenses of BatteryBar Pro which costs 9.95$ per license . So There will be 2 winners in this Give Away.


Rules For Participating in this give away of BatteryBar Pro.


The rules are simple. For being eligible to participate in this contest just do the following.


  1. Subscribe to Computing Unleashed by using the any of the subscription boxes seen ( top right sidebar / just the one below) or subscribe by clicking on  this link

    (Upon submitting your email address and submitting you will receive a mail from feedburner in your mailbox. Use the link in that mail to activate your subscription to Computing Unleashed successfully).

  2. Now just Leave a Meaningful comment to this post regarding BatteryBar Pro.


The winners were selected randomly and they are mel and daniel. Congratulations to mel and daniel.

. Thanks for others too.

Labels:

Monday, July 20, 2009

The Best Laptop Battery Meter for Windows - BatteryBar

Portable devices have become a part of our daily life. Most of us today own a Laptop for obvious reasons. Most of us love it because it is portable and very useful. But some thing that most of the Laptop owners feels distressful is about the battery life of Laptops. So, the battery life of the Laptops play a crucial role. We strive to preserve the battery power for getting enough time to save our work. So it is essential to know how much charge is left on the battery to finish up our work without any worries.


Windows have an inbuilt Laptop Battery Meter which shows off the percentage of charge left on the Laptop’s battery and the time left for using the Laptop without direct main power supply. But this information provided by the Laptop Battery Meter in windows is not accurate and the information we get from it is very limited.


BatteryBar is a simple and powerful tool that is a good replacement to the outdated windows inbuilt


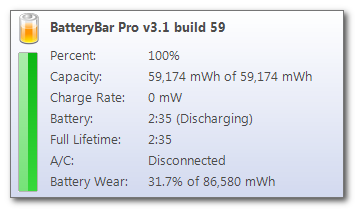
Laptop Battery Meter. BatteryBar shows the status of your Laptop’s battery in the windows taskbar. Unlike Windows inbuilt Laptop battery meter BatteryBar shows the most accurate time remaining on your battery.


Screen Shots of BatteryBar


BatteryBar - detailed information <br />about your battery's status

The Best Laptop Battery Meter for Windows - BatteryBar

The Best Laptop Battery Meter for Windows - BatteryBar

BatteryBar perpetually watches the status of your battery as you use your Laptop. It also give you the estimate time left, tracks the historical data continuously and gives you how much stress you are putting on your Laptops battery.


If you need to access the preferences area of BatteryBar  you need to have the full pro version of the software. The Pro version has still more flexibility and functionality. The full Pro version of BatteryBar  costs just $9.95. Its worth for the money if you need an accurate battery meter for your Laptop.


You can Freely Try the Free Version of BatteryBar and feel how good it is.

Download BatteryBar


Labels: ,

Saturday, July 18, 2009

How To Perfectly Protect Your DVD/CD from Future Damages – A Must Read Guide For Every DVD/CD Collectors

DVD, CD and BD media keep their data only for a limited period of time. And the data starts to degrade slowly. It might be possible to get back some files on the DVD’s or CDs but in case of one single big file of some 650 MB or like wise things become hard. Even if a small part of that file gets unreadable we lose the whole file. You might have got errors such as “Cannot copy file: Data error (cyclic redundancy check)“ / “Cannot copy file: Cannot read from the source file or disk” like wise.


The invasion Flash Drives and portable hard disks have still not affected the market of CDs and DVDs and the latter are still the most widely used storage mediums. Their cheap price is the main factor behind this gain. DVD’s and CDs are cheaper but they lack one defect. DVDs and CDs gradually degrade with time. In the earlier days i used to take backups of my important data to CDs and keep them safely (almost at a dust proof place). I thought that even after long time my data would be safe. My PC’s hard disk used to work 3-5 hours during those days. So i thought that it would be safer to store and Keep the data in CDs rather than keeping on my Hard Disks. But when i tried to read the CD after a very long time but every time it failed. The CDs were not able to read except very few.

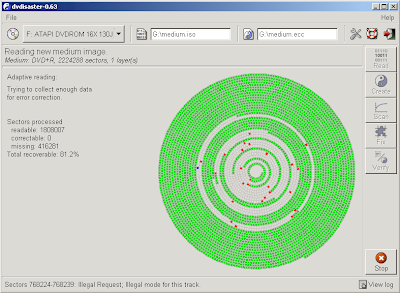
Protect Your DVD/CD from Future DamagesBut there is happy news for all. There is a way to Protect DVD, CD or BD Medias from future damages. We can still recover the data stored in them very easily.


Thanks to dvdisaster. Dvdisaster will help you to recover the data’s stored in old CDs, DVDs etc. dvdisaster is one nice software that helps us to recover data from DVDs, CDs etc. dvdisaster makes this possible by integrating some error detection and correction codes along with the burned data. So even if some read errors have developed the data will be completely recoverable. The data recovery will be possible even if the DVD, CD or BD gets scratched or gets errors due to its oldness. dvdisaster reads the original DVD or CD and then creates an error correction file which consumes a 15% of additional space. For e.g. if a CD of 700MB of data is taken it needs approx. 105MB of space for creating the error correction file and a 4.7GB DVD file needs an error correction file of approx. 700 MB space. When the DVD, CD or BD get’s scratched or encounter readability problems or errors, then dvdisaster will make use of the error correction file to correctly recover the data from the scratched DVD, CD or BD.

How to Use dvdisaster to Protect DVD,CD or BD


  1. First insert the DVD/CD from which needs to be protected.

  2. Run dvdisaster and choose the correct DVD/CD and from File click on Select Image and give the destination to save the image file.

  3. Again from File Select Parity File and give the location to save the error correction (.ECC) file.

  4. Selection the option called Read see in the right pane of dvdisaster. This will take some time so go for a cup of coffee ad relax.

  5. After the reading process gets finished click Create option to create the ECC file.

How to Use dvdisaster to Recover  DVD, CD or BD from Read Errors


From the above mentioned steps we have successfully created the error correction file. Now whenever you have read errors with your DVD, CD or BD and not able to copy the files from them properly, just follow the steps below.


  1. Run dvdisaster and locate the DVD/CD and click on Read.

  2. Now just choose the ECC file present in the DVD/CD and click on Fix. You can burn the image file in ISO extension to a DVD/CD.


Protect Your DVD/CD from Future Damages

What if i haven't created the Error Correction (.ECC) File before ? I have a very old DVD/CD with me.


I am sure at least some of the users (may be most) reading this post will have this question in their mind.


dvdisaster can also be used to recover the contents of a damaged DVD/CD even when if you havent created the error correction (.ECC) file before / if no ECC file is available. Only problem is that the data recovery chances are less without the error correction (.ECC) file


dvdisaster will create an image file by reading the entire disk by skipping unreadable portions / damaged parts and then tries to recover the missing data from the DVD/CD by scanning then repeatedly.


And the best of the best dvdisaster is free and it is available for Windows, Mac OSX,Linux and Unix.

Download dvdisaster

Labels: ,

Thursday, July 16, 2009

Automatically Identify Correct Program to Open Any File Formats with OpenWith.org

I am sure that many of us had come across a situation in which we would be in a dilemma to use which program to open an unknown file format (extention). We usually search in the internet for the correct program to open that unknown file format (extension). Forget those painful days when the new OpenWith.org Desktop Tool is available. OpenWith.org Desktop Tool makes it easier to find the correct program to open unknown file formats (extension).


Once the installation of OpenWith.org Desktop Tool desktop is completed the users can use it directly.  When you right click on an unknown file format (extension) an option will be automatically displayed in the right click menu as “OpenWith.org – How do I Open This?”. When  you click on that option, OpenWith.org Desktop Tool will search on your system for any suitable program to open the file (extension) if the required program is not installed in your system then OpenWith.org Desktop Tool will search the internet automatically and provide you with the download link of the suitable program to open that unknown file (extension).


Automatically Identify Correct Program to Open Any Type of File Formats with OpenWith.org

OpenWith.org Desktop Tool works with Windows 98, ME, 2000, XP and Vista.


Download OpenWith.org Desktop Tool


Labels: , ,

Wednesday, July 15, 2009

Free Utility To Create A Bootable USB To Install Windows 7, Vista & Server 2008

There are many Tutorials in the net about How to Create a Bootable USB Drive To Install Windows 7, Windows Vista. And only a few of them are working correctly. Following these guides are time consuming. But creating a USB Drive to Install Windows 7 or Vista will become really handy when the DVD drive has problems. Windows Vista or Windows 7 DVD's loses its life after prolonged use. More often they get scratched. So here the USB Drives with Windows 7 or vista comes into play. Create a Bootable USB To Install Windows 7,Vista & Server 2008Earlier i had created some guides to Create a bootable Pendrive or USB to install Windows Vista and Install Windows 7 from a Pendrive (Working 100 %)/ How to create a bootable Pendrive to install Windows 7. But following these were a bit time consuming and a difficult for new users. I came across a utility called Bootable USB from AskVG. I This utility was created by one of the AskVG readers. What is interesting about Bootable USB is that it automates the process of creating a bootable USB Drive to Install Windows 7,Vista & Server 2008.
Windows Users dont have to type the step by step commands, copying files from one location to another etc from now on. With Bootable USB its very simple.
Utility To Create a Bootable USB To Install Vista, 7 & Server 2008

Bootable USB Requirements

  • A USB Drive 4GB or Greater.

  • Windows Vista, Server 2008 or 7 ISO image or DVD

  • Windows Vista (SP1 or SP2), Server 2008 or 7 installed


So you need to keep in mind that you must already have windows 7 or vista installed in your PC in order to create a Bootable USB Drive.

The utility is portable,free and is small as 0.99 MB.

How to Use Bootable USB To Create A Bootable USB To Install Windows 7,Vista

Bootable USB follows a four step process.
  • Check USB drive (To check whether your USB drive is connected or not)

  • Format USB Drive

  • Choose DVD or ISO image (To copy the needed files to USB drive)

  • Start the process to create bootable USB drive


Bootable USB automatically runs the required commands in Windows 7 / vista fro making the USB drive bootable. All you need to do is to follow these four simple steps.

Note: Windows XP users cant Run this utility. If you try to run it Bootable USB will show a message saying that " Unsupported Opperating System. Supported Operating systems are Windows Vista (SP1 or later) ". On Vista with no SP there is an error diskpart which is solved later by microsft on SP1 and later.

And before selecting the DVD or ISO image of the Windows 7 or Vista installation make sure it is free of errors.
Bootable USB works with 64 bit versions of Windows 7, Vista too. Bootable USB is a nice and sleek application that is of great use in creating A Bootable USB To Install Windows 7.

Download Bootable USB (Skydrive)


Friends, Show up your Opinions about this nice utility
.

Labels: , ,

Monday, July 13, 2009

How to Extract Text From Images for Free (OCR) - 2 Easy Ways

Have you thought about extracting text seen on images?. This idea was lurking in my mind for a long time. Today i searched and found a software for extracting text from images. But the software was not free. It was very costly too. Then after i came across two ways to extract text from images easily for free. Optical Character Recognition is a method of extracting the text see on images and then making it available as a text document for editing.

Here is How to Extract Text From Images For Free


  1. JOCR is a Freeware developed by EverRex Software that will help you to do this job easily. JOCR will capture the images on your screen and then convert the captured image to editable text document. The use of JOCR really becomes important when we need resurrect the protected files whose text can not be copied. JOCR can extract the text from Web pages, PDF files, error messages too. So JOCR could be used to copy the text on a blocked website easily. It offers many capture modes.

     Extract Text From Images Free With JOCR
    You need to have Microsoft Office 2003 or higher version for JOCR to work. JOCR supports a wide variety of languages.


  2. Download JOCR


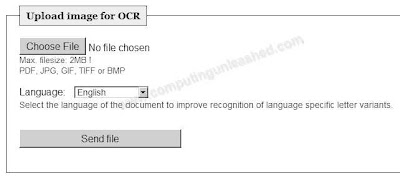
  3. Free-OCR.com is a Free Online Service to Extract Text From Images for Free. This free online OCR service is very simple to use. All you need to do is, just to Upload the image from which the text is to be extracted. Free-OCR.com supports PDF, GIF, JPG, BMP or TIFF file formats.
    Extract Text From Images for Free with Free-OCR.com
    The only restriction is that the images must not be larger than 2MB, no wider or higher than 5000 pixels and there is a limit of 10 image uploads per hour


Visit Free-OCR.com

Labels: , ,

Friday, July 10, 2009

How to Find Out The Read & Write Speed of USB Flash Drives/Hard Drives Correctly

Test the Speed of Your USB Flash DrivePortability, accessibility, affordability and portability have contributed to the wide use of USB Flash Drives as a storage medium now. Most of us today own a USB Flash Drives. The storage capacity is not the prime factor for a USB Flash Drives to consider it to be good. There are many other factors such as durability, price and Performance that comes into account. Among this three the Performance comes first because performance is related with time eg. if we choose two USB Flash Drives a 4 GB and 16 GB. The 16 GB Flash Drive will be always behind the 4 GB Flash Drive when it comes to performance in most cases. So our job gets done quickly with the 4 GB Flash Drive. Here i will tell how to Test/Find out the Read and Write Speed of any USB Flash Drive easily and accurately.

Most of the people analyze the potential of a USB Flash Drive just by seeing its design and price. But this is wrong as some Flash Drives will be really slow. So we must be able to choose the correct USB Flash Drive which performs really well and give good bang for the buck.

How to Test/Find out the Read and Write Speed of any USB Flash Drive/Hard Drives


USBDeview is a nice software that will help to Test/find out the Speed of your USB Flash Drives. USBDeview was meant for finding out which all USB drives are used on a computer. The speed testing feature comes with it.

The software comes with a very simple interface and is easy to use for beginners too. When you run the software it will list all the USB devices connected to your computer.
To Test/Find out the Read and Write Speed of any USB Flash Drive just right click on the required flash drive from the shown list and select Speed Test.

How USBDeview to Test/Check the Read and Write Speed of USB Flash Drive/Hard Drives
Find Out The Read & Write Speed of USB Flash Drives,Hard Drives Correctly
USBDeview checks the read/ write speed of the USB drives by sequential read and write operations because the drive shows the maximum speed when copying a single file than copying multiple files of same size. For eg. Copying a 2 GB single file is much faster than copying a lot of files with all together make 2 GB and generlly this is the case with almost all storage devices.

After the speed of your USB device is recorded by USBDeview an option will be displayed called "Publish Test Result ". Clicking this will submit your Read/Write Speed of your USB device with their records which have information submitted by various users of USBDeview. So you can easily compare your device with other USB devices too. USBDeview is free, portable and small in size about (59.13 kb).

Download USBDeview

Labels: , , ,

Thursday, July 9, 2009

18 (Most) Beautiful Themes For Windows 7

As we know windows 7 is already very beautiful due to its Aero interface and nice looks. Why dont we go for a change rather than seeing the default theme every day?. So Here are Some Beautiful Themes For Windows 7.


Aero Diamond Theme for Windows 7

- Aero Diamond is a stunning new theme for Windows 7 with a new glassy start menu, start orb, new blue close button, a wallpaper slideshow with 6 wallpapers and more.. .

Aero Diamond Theme for Windows 7

download Aero Diamond Theme for Windows 7


Aero Big Theme for Windows 7

- Aero Big Window comes with new star menu, new control panel and explorer color, new shell style, new top bar, new progress bar, new icons and more.. .

Aero Big Theme for Windows 7

Download Aero Big Theme for Windows 7


Seven Aero Blue Wave

- A cool blue aero theme for windows 7 with icons, gadgets etc.

Seven Aero Blue Wave Theme for Windows 7

download Seven Aero Blue Wave Theme for Windows 7


Aero Xtreme 7 Theme for Windows 7

- Another stunning new theme for windows 7. What makes these theme special is the glassy look of it with icons, gadgets etc.

Aero Xtreme 7 VS Theme for Windows 7

download Aero Xtreme 7 VS Theme for Windows 7


Aero Hilled Theme for Windows 7

- a sleek and nice transparent theme with a glassy start menu, transparent taskbar etc.

Aero Hilled Theme for Windows 7

Download Aero Hilled Theme for Windows 7


AeroPlain Theme for Windows 7

- AeroPlain is a modified version of the basic Theme for Windows 7 which gives a better look against dark wallpapers.

AeroPlain Theme for Windows 7

Download AeroPlain Theme for Windows 7


Seven Aero Shine Black Theme for Windows 7

- A black theme with some nice icons and gadgets.

Seven Aero Shine Black Theme for Windows 7

Download Seven Aero Shine Black Theme for Windows 7


ThaImpact Theme for Windows 7

- A fully dark theme, with hints of blue with some beautiful icons, wallpapers, start menu icons etc.

ThaImpact Theme for Windows 7

Download ThaImpact Theme for Windows 7


Leopard OSX Theme(for Windows 7 RC)

- Enjoy the Mac Style theme for Windows 7 RC. Leopard OSX Theme comes with a new adress bar, new close/min/max buttons, new start panel, new frames, new progres bar, new scroll bar, new orb ,remake a new control panel etc.

Leopard OSX Theme for Windows 7 RC

Download Leopard OSX Theme for Windows 7 RC


Aero Xtreme 7 VS2 for Win 7 RC

- An enhanced version on the above mentioned Aero Xtreme 7 visual style for windows 7

Aero Xtreme 7 VS2 for Win 7 RC

Download Aero Xtreme 7 VS2 for Win 7 RC


Longhorn Multitheme for Windows 7

-A nice multi theme pack with 4 themes in 1. (Longhorn 4074, Longhorn Aero, Longhorn Jade, Longhorn PDC)

Longhorn Multitheme for Windows 7

Download Longhorn Multi theme for Windows 7


SevenMaxClearLiveBlack

- Seven Max Clear Live Black Edition comes with new icons, gadgets. Its a Nice theme.

Seven Max Clear Live Black Edition Theme for Windows 7

Download Seven Max Clear Live Black Edition Theme for Windows 7


SiCo Theme for Windows 7

- It has a new start panel line, New black style shellstyle, New user picture frame in start panel, Brand new taskbar with curved corners, Glow text on taskbar and start panel, Top Shellstyle for Explorer and Games Folder, New Media Player Buttons, and many more.

SiCo Theme for Windows 7

Download SiCo Theme for Windows 7


Windows7 Black Transparent theme

- A nice black theme made from the original Aero Theme in Windows 7.

Windows7 Black Transparent theme

Download Windows7 Black Transparent theme


Windows 7 RED Theme

- A cool Red Theme for Windows 7 with new gadgets, screen savers and wallpapers.

Windows 7 RED Theme

Download Windows 7 RED Theme


Windows 8 Theme For Windows 7

- A nice theme with Blue Progress in Green Bar, Windows 8 Move Progress, Transparent Start Panel, Window 8 Explorer Longhorn Style, Close Max Min Old New Style, Super Pinned in Taskbar, Windows 8 Start Orb and Windows 8 Logon Screen.

Windows 8 Theme For Windows 7

Download Windows 8 Theme For Windows 7


The ‘Ultimate’ Theme for Windows 7

- The ‘Ultimate’ Theme for Windows 7 was created from the high resolution Windows 7 wallpapers with new glass windows color for each one.

Ultimate Theme for Windows 7

Download Ultimate Theme for Windows 7


Liked the Themes, Then Dont miss this list of

Another 25 Beautiful Themes For Windows 7


Your suggestions are welcome. If you know any new Windows 7 Theme comment it. Also if you like it please give a "digg" to this post .

Labels: ,